Chic Accessories – Fingerless gloves

Getting a head start on my fall/winter crochet accessories for myself and my family. My kids love fingerless gloves, so I made them each a pair, and I made myself a pair, as well. I live in the Pacific Northwest, and I think the gloves would come in handy for biking riding, when the weather turns crisp and cool! Also, I’m so pleased with the results that I’ll be making some extras to give as b’day and Christmas gifts. The pattern is really easy, and I’ve included it below.

Enjoying and Happy Crocheting,

Yoli

ab69d912-26da-4224-a00b-8ed9947954da

Fingerless Gloves

Materials

H Hook
1 Skein Worsted Weight Yarn

Abbreviations
CH – Chain
SC – Single Crochet
SL ST – Slip Stitch

DC – Double Crochet Pattern

Row 1: Ch 11, turn. SC into 2nd ch from hook and each ch after, turn.
Row 2: Ch 1, SC into each sc across.
Row 3-21: Repeat row 2.

Fold piece in half and sl st together. Begin now working around the top edge of the cuff.

Row 1: ch 1, SC 23 evenly around. Sl st to first SC

Row 2-5: ch 2, DC in same st and each st around. Sl st to first DC

Row 6-7: ch 1, SC in same st and each st around. Sl st to first SC

Row 8: Left Glove: ch 1, SC in first 4 st, ch 4, sk next 4 st, sc in next st and each remaining st

Right Glove: ch 1, SC in next 15 st, ch 4, sk next 4 st, SC to end of row.

Row 9-12: ch 1, SC in each st around.

Row 13: ch 2, make 4 DC in same st, *sk 2 st, 4 DC in next st* repeat around.

Finish off and weave in ends!

SPA ESSENTIALS

I feel I’ve been lagging on my blog and projects, but I just recently moved into a beautiful home in the community  known as “Garden Home” in Portland, Or. Anyway, a couple of months ago a friend from California contacted me about donating some crochet items for a silent auction for an annual tea party at a church I use to attend in Menifee, CA. Of course I said yes because of my generous nature.  I normally make hats and scarves, but California is entering into its hot weather season, so I needed to come up with a unique idea. That’s when I came up with “Spa Essentials” – a beautiful package containing face/wash cloths, shower srunchie, soap saver bag and makeup remover/exfoliator pads made of soft 100% cotton yarn by Bernat Sugar & Cream. I also made the package extra special by including a honey & milk finishing scrub by Scrubie.com, a product made in Beaverton, OR. I sent the package a few days ago, and I look forward to hearing that it was received and finally who will be winning my donation at the silent auction. 

Happy Crocheting,

YoliImage

Crochet Bag with Drawstring

Hello Friends,

Here are the remaining crochet bags, as mentioned in my previous post.  I crocheted them in some pretty colors!! I previously called them “soap saver bags”, but they could be used for anything. The cotton yarn I used is made by “Sugar’n cream. This is a coarse yarn, very affordable, and is available in pale and bright colors.  Also, the brighter yarns have a lot of dye. I would suggest washing your finished product first, with like colors, before using the bag as a soap saver bag. 

The pattern is really simple. Using an “I” hook (5.5mm). Chain 10, put hook in 2nd chain from hook, and half double crochet across 9 times, chain 1, turn and crocheted again 9 times (with the same stitch), until you have 3 rows. Crochet first side:  you may need 2-4 hdc stitches on the sides, the goal for the sides is to avoid big holes, crochet, clean and tight. Then  continue to crochet in a round until you’ve reached the desired height. In my case, and depending on the stitch, I  ended up with 10-12 rows and 1 slip stitch row at the very end. Weave in the ends. And for the drawstring, in the same yarn or a contrasting color, chain 70, finish off and weave through last row of bag. Knot off the ends to form a secure loop. So experiment with other hook sizes and stitches, and most of all have fun!!

Lastly, my daughter is taking these colorful baggies to school later today, and will be offering them to her friends for $5.00 – I told her she can keep the profits, so she can continue to build up her savings account.

Well as always, happy crocheting,

Yoli

ImageImageImage

CROCHET WASH CLOTH AND SOAP SAVER BAG

Hello Friends!!

So the last few days, I’ve been a bit obsessed with a new stitch. The stitch is called the star or marguerite stitch. I finally got it down, and I made this adorable wash cloth that I’m sending to a friend in California. I also made her a cute soap saver bag, and it’s crocheted in a half double and puff stitch. All in all these have been great projects, and each item has so much potential, especially the bag!! I was thinking the bag could be used as a coin purse, a party or wedding favor – the possibilities are endless. I’ll post the pattern later, and I look forward to your comments.

Happy Crocheting,

Yoli

843e8e88-ddd3-482a-b476-eca6a7267dd6

9889c061-c8c9-4d3b-8c0b-cb9794acf141 (1)

80b83d61-9f7b-4de9-b3d8-ec8397e91de5

Men’s Crochet Beanie

Closer to finishing a dozen hats, and I’ve captured them in the new picture. Okay, back to crocheting I go!!!

Yoli 🙂

YARN PASSION

Quique Mens Crochet Hat

Hello Everyone:

I’m so excited to share this post because it’s my first time writing a pattern, and my first time making a ribbed hat.  My husband is modeling the hat, and I think it turned out rather well, and it looks very fashionable on him, too!!.  He’s been wearing the hat for the past few days, and he says he likes the fit and it’s keeping him warm, especially since the cold has really hit us strongly in Beaverton, Oregon. Well, I’m rushing to make a dozen of these for some other great guys in my life, so enjoy the pattern and happy holidays!!!


Materials

Size I (9/5.50mm) Crochet Hook

100 yards Worsted Weight Yarn (I used basic Red Heart Super Saver)

Special Stitches

FPDC (Front Post Double Crochet):

Yarn over, insert hook from right to left behind post of stitch from previous round. Yarn over, pull loop…

View original post 444 more words

Men’s Crochet Beanie

Quique Mens Crochet Hat

Hello Everyone:

I’m so excited to share this post because it’s my first time writing a pattern, and my first time making a ribbed hat.  My husband is modeling the hat, and I think it turned out rather well, and it looks very fashionable on him, too!!.  He’s been wearing the hat for the past few days, and he says he likes the fit and it’s keeping him warm, especially since the cold has really hit us strongly in Beaverton, Oregon. Well, I’m rushing to make a dozen of these for some other great guys in my life, so enjoy the pattern and happy holidays!!!


Materials

Size I (9/5.50mm) Crochet Hook

100 yards Worsted Weight Yarn (I used basic Red Heart Super Saver)

Special Stitches

FPDC (Front Post Double Crochet):

Yarn over, insert hook from right to left behind post of stitch from previous round. Yarn over, pull loop from behind post (3 loops remain on hook). Yarn over, pull through two loops (2 loops on hook).  Yarn over, pull through remaining two loops.

Step 5: Yarn over, pull through one loop.

FPSC (Front Post Single Crochet): Worked the same as FPDC, but no yarn over at beginning. Insert hook from right to left behind post of previous round. Yarn over, pull loop from behind post (2 loops on hook). Yarn over, pull through remaining two loops.

Gauge

First 3 Rows in Pattern = 4 Inches in Diameter.  To ensure a perfect fit, take time to check your gauge and adjust hook size if necessary. Complete flat circle should measure 7in.

Men’s Crochet Hat Directions

Chain 3, join with slip stitch to form ring.

Round 1: CH 2 (counts as first DC, now and throughout).  12 more DC into ring (13 sts).  Join to top of ch-2 with a SL ST.

Round 2: 2 DC into each stitch around (26 sts). Join to top of ch-2 with a SL ST.

Round 3: *2 DC into next stitch, 1 DC in next stitch,* Repeat around (38 sts). Join to top of ch-2 with a SL ST.

Round 4: *2 DC into next stitch, 1 DC in next 2 stitches,* Repeat around (50 sts). Join to top of ch-2 with a SL ST.

Round 5: * 2 DC into next stitch, 1 DC in next 6 stitches,* Repeat around (57 sts). Join to top of ch-2 with a SL ST.

Round 6: * 2 DC into next stitch, 1 DC in next 7 stitches,* Repeat around (63sts). Join to top of ch-2 with a SL

Round 7: * 2 DC into next stitch, 1 DC in next 8 stitches,* Repeat around (70 sts). Join to top of ch-2 with a SL

Rounds 8 – 15: 1 DC into each stitch around (70 sts). Join to top of ch-2 with a SL ST.

Rounds 16 – 17: Ch 2, *FPDC into next stitch, DC in next stitch,* Repeat around (70 sts). Join to top of ch-2 with a SL ST.

Round 18: Ch 1 (counts as first SC), *FPSC into next stitch, SC into next stitch,* Repeat around *(70 sts). Join to top of ch-1 with a SL ST.

Fasten Off.

Hat size  Guide

Age Head Size Hat Size Hat Height Flat Circle Diameter
0-6 Months 13- 15 inches 12-14 inches 4.5 – 5 inches 4 inches
6-12 Months 16-19 inches 14-18 inches 5.5 inches 4.5 inches
1-3 Years 18-21 inches 17-20 inches 6.5 inches 5.5 inches
4+ Years 20-22 inches 19-21 inches 7.5 inches 6 inches
Women 22 inches 20 inches 8.5 inches 6.5 inches
Men 23 inches 21 inches 9.5 inches 6.75-7 inches

Continue reading

Quick Project: Crochet Basket with Handles

I’m home relaxing, eating thanksgiving leftovers, watching movies, and of course crocheting. Today I made myself a crochet basket. I was inspired to make this because I am often misplacing my crochet tools. Problem solved, with this handy basket, and now I’ll never misplace my crochet tools.

The two-tone part of the basket was created by combing to separate yarns: a sage color in wool and a chocolate brown in acrylic. I started with a “J” hook and chained 5, connected the chain, chained 1 and single crocheted 10 times and increased until I had 70 stitches. Then I continued evenly until I ran out of the sage colored wool yarn. I slip stitched and continued with the chocolate brown yarn and switched to an “I” hook. I continued evenly in the solid color for about 5 rows. Then I created my handles and finished with a couple of more rows and weaved in al my loose ends

If you are interested, I’ll write up a pattern. Let me know.

Happy Crocheting,

Yoli 🙂

Holiday Project – Sleek & Skinny Earwarmer/Headband

As a crocheter, I’m connected with others that have the same passion, and I came across this earwarmer/headband “free” pattern! So, I thought I would try it this weekend!! I made one in a black acrylic yarn and a second in a brown & white wool yarn (see attached picture). They are simply lovely, and I’m going to make a nice amount of them and sell them, so I can earn some spending money for my upcoming trip to California. I’ll be selling the acrylic ones for $18 and the wool ones for $25 (plus shipping and handling) If you have the same passion here’s the link: http://cre8tioncrochet.com/2013/07/sleek-and-skinny-ear-warmer-headband/

Recycle Your Old Jeans

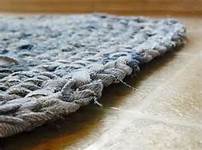
Not sure what to do with your old jeans…well, how about crocheting a sturdy rug? It will add appeal and style to any part of your home!

Jean Rug

Materials:
At least 3 or 4 pairs of jeans
Sharp scissors or rotary cutter with ruler and mat
Seam ripper
Size N crochet hook or larger
Lint roller, and vacuum, and duster!

1. For this rug, I used 4 pairs of jeans. To cut the jeans into a yarn-like material, I started by cutting up the sides, cutting the bulky side seams right off. Then I cut up around the pockets, across the top, and down alongside the zipper and the inside leg seam. The point is to remove all the bulky stuff while still keeping the largest piece of fabric intact as possible.

2. After doing this on each side, front and back, I was left with four panels (and a very interesting garter belt type of accessory). I cut the bottom hem seam off each panel, then removed the back pockets with a seam ripper. Surprisingly, the fabric under the pockets is so much darker, which made for cool color variations in the yarn.

Jean rug 2

3. Next, take one panel and lay it flat on a table or cutting mat. Starting on the long side which is straighter, cut a 3/4 inch wide strip from top to bottom, stopping 1 inch from the bottom. Next, cut a 3/4 inch strip from bottom to top, stopping 1 inch from the top. Follow the diagram below. It’s okay to angle your cutting a little bit, to get the most from the fabric.

4. Once your panel is cut into one long strip, you can trim the corners on the turns you made at the ends. This will take some of the bulk out of those spots so your crocheting will be smoother. If you like the rougher look, go ahead and leave the turns alone.

5. Once all your panels are cut, roll each pair of jeans into its own yarn ball. I kept the pairs separate so I could alternate colors (some pairs were lighter/more stripey than others).

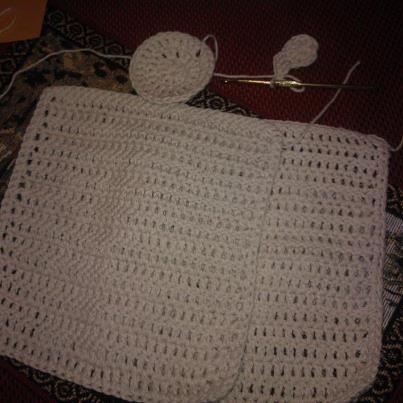
6. Now comes the crocheting. Take a fabric strip and make a chain of about 20 or 25. The longer the chain, the more rectangular and less square your rug will be. (Square rug directions at the end of this tutorial.) Next, 1 sc in the second chain from hook. 1 sc in all of the chains, then 3 sc in the last chain to turn the corner. Then 1 sc in the back of each chain stitch. 3 sc in the last stitch.

7. Continue spiraling around the outside, but when you get to the first of the [3 sc in one stitch], 3 sc in that stitch. This 3 sc cluster will make your corners. This is a bit of a guessing game, as I noticed my rectangle was losing its shape after a while. I adjusted which stitch I made my 3sc in, so the shape of the rug would be straighter.

8. When you run out of one strip of yarn, simply leave a few inches of a tail and start a new strip. I suggest weaving in the tails as you go by trapping them within the first few sc’s of the new strand. I doubt I would find a yarn needle large enough for this yarn!

9. When you reach the size you want, bring the last round to a corner, then slip stitch it to one of the corner stitches. With the tail, I threaded it in using my crochet hook. All done!

*Be warned, this project is pretty linty. Pieces of denim will cover your outfit, your couch, your floor. And the finished project has some loose fibers that stick out of the rug. I think it adds character, but you could always choose a less-ravely fabric for a cleaner look.

To make a SQUARE rug:
I haven’t tried this style yet, but this is how I’d imagine the pattern going.

1. Make a chain of 5
2. Join to the first chain to make a ring.
3. 16 sc into the ring.
4. [1 sc in next 3 stitches, 3 sc in next] four times.
5. [1 sc in next 5 stitches, 3 sc in next] four times.
6. Repeat this pattern in rounds until the rug is as large as you want!